Photo by David Travis on Unsplash
Fluent Validation in ASP.NET Windows App
An effective and easy way of validating input in the forms in .net framework
Table of contents
In programming, validation refers to the process of checking whether input data meets certain criteria or requirements, usually specified by the program's design or business rules. This is done to ensure that the data is accurate, complete, and usable for the intended purpose. Validation is an important part of programming because it helps ensure the quality and reliability of the data that the program processes. It can also help prevent errors and improve the user experience by providing feedback to the user when input is incorrect or incomplete.
What is Fluent Validation?
Fluent Validation is a popular validation library for .NET that allows developers to define validation rules for their data models using a fluent, easy-to-read syntax. It is an open-source library that is available as a NuGet package and can be used with any .NET application, including ASP.NET Core, Web Forms, Windows Forms, and WPF.
Fluent validations use Fluent interface and lambda expressions to build validation rules. Fluent Validation provides a set of pre-defined validation rules that can be used out-of-the-box, such as NotNull, NotEmpty, EmailAddress, GreaterThan, and others. In addition, it allows developers to create their own custom validation rules by implementing the IValidator interface. Fluent validation is a free-to-use .NET validation library that helps you make your validations clean and easy to both create and maintain.It even works on external models that you don’t have access to, with ease.
Using Fluent Validation, developers can define validation rules for their data models in a separate class, which helps keep their code organized and maintainable. Validation rules can be chained together using a fluent syntax, making it easy to define complex validation scenarios.
How to install Fluent Validation?
The fluent validation library can be installed in the .net project with two methods given below
Package console
To install the Fluent Validation go to Tools -> Nuget Package Manager -> Package Manager console.
And paste the command given below
Install-Package FluentValidation
Nuget Package Manager
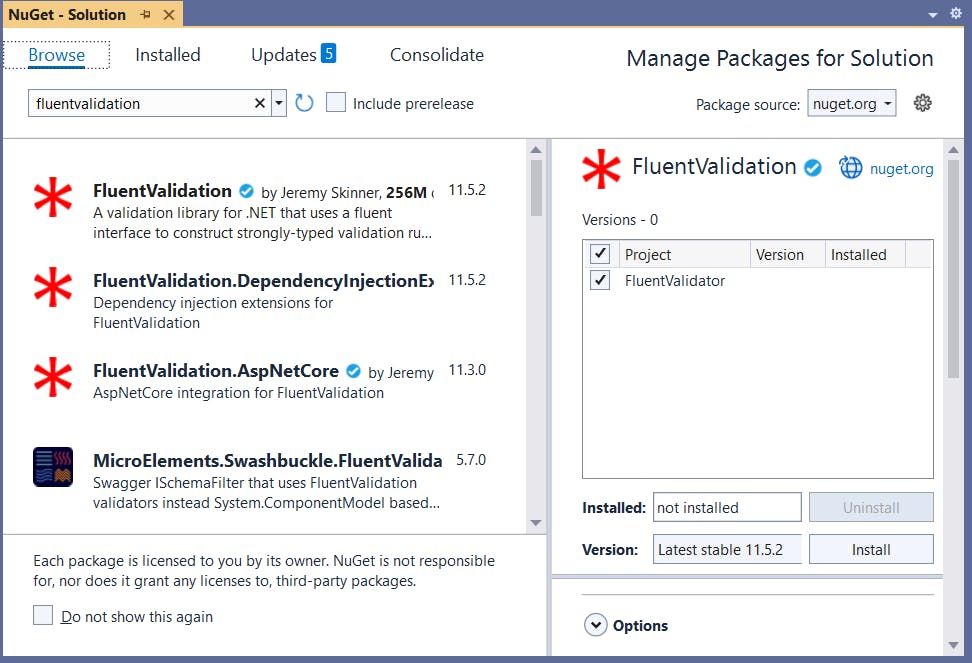
To install the Fluent Validation go to Tools -> Nuget Package Manager -> Manage Nuget Packages for Solution.

Now select the first option and select the project in which you want to install the Fluent Validation library and then click the install button (Make sure you install the latest stable project).
Validating Windows Form Application using Fluent Validation
Let us take an example in which you need to validate an application that adds employee data to the database. Lets define an Employee class definition as given below.
using System;
using System.Collections.Generic;
using System.Linq;
using System.Text;
using System.Threading.Tasks;

namespace FluentValidationDemo
{
    public class Employee
    {
        public Employee() { }
        public string FirstName { get; set; }=string.Empty;
        public string LastName { get; set; } =string.Empty;
        public string EmailAddress { get; set; }=string.Empty;
        public string PhoneNumber { get; set; }

        public decimal Salary { get; set; }
    }
}
After installing the FluentValidation the package you need to create a new class. Generally, to define the validation rules for the class object you need to make sure that you create a class that inherits from AbstractValidator<T> , where T represents the class that you wish to validate. All the validation rules must be present in the constructor of the validator class.
Terms And Methods of FluentValidation package
There are many terms and built-in validator methods present in the FluentValidation package. Some of them are given below.
RuleFor: It is used to select the property on which you wish to apply the rule on.RuleForEach: It is used to apply the same rule on multiple properties in the collection.RuleSet: RuleSets allow you to group validation rules together which can be executed together as a group.ValidationResult: It is the class used to collect information about all the validation done and the failures that have happened during the rule check.IsValid: To check if all the rules are in check we useValidationResult.IsValid.Errors: To get a collection of all the ValidationFailure which contains details such asErrorCode,PropertyName,ErrorMessage,Severity
Cascade(CascadeMode): This method is used to define how FluentValidation executes rules and validators when a particular rule in the validator class, or validator in the rule fails. There are three types ofcascademode:continue,stopandstoponfirstfailureWithMessage(string message): This method is used to show a message when there is a validation failureWithSeverity(Severity): By default, if these rules fail they will have a severity ofError.Available options areError,Warning, orInfo.- To set the severity level globally, you can set the
Severityproperty on the staticValidatorOptionsclass during your application’s startup routine:ValidatorOptions.Global.Severity = Severity.Info
- To set the severity level globally, you can set the
NotEmpty(): Checks if the property is blankNotNull(): Checks if the property is NullLength(int maxValue): Checks if the string property has a value of length maxValueLength(int min,int max): Checks the if the length of the string property is within the min and max rangeNotEqual(string value): Ensures that the value of the specified property is not equal to a particular valueEqual(string value): Ensures that the value of the specified property is equal to a particular valueMust(Func<string, bool> predicate): This is a predicate validator. Passes the value of the specified property into a delegate that can perform custom validation logic on the value. You can make a custom function that returns boolean valueMatches(string expression): This is a regex expression validator. Ensures that the value of the specified property matches the given regular expression.EmailAddress(EmailValidationMode): This is an email validator. Ensures that the value of the specified property is a valid email address format. There are two types of EmailValidationMode i.eAspNetCoreCompatibleandNet4xRegex(Outdated format)CreditCard(): Checks whether a string property could be a valid credit card number.IsInEnum(): Checks whether a numeric value is valid to be in that enum. This is used to prevent numeric values from being cast to an enum type when the resulting value would be invalidEmpty(): Opposite of theNotEmptyvalidator. Checks if a property value is null, or is the default value for the type.Null(): Checks if a property value is nullExclusiveBetween(int from, int to): Checks whether the property value is in a range between the two specified numbers (exclusive)InclusiveBetween(int from, int to): Checks whether the property value is in a range between the two specified numbers (inclusive).PrecisionScale(int precision, int scale, bool ignoringtrailingZeros): Checks whether a decimal value has the specified precision and scale
Validating the Employee class using the above methods
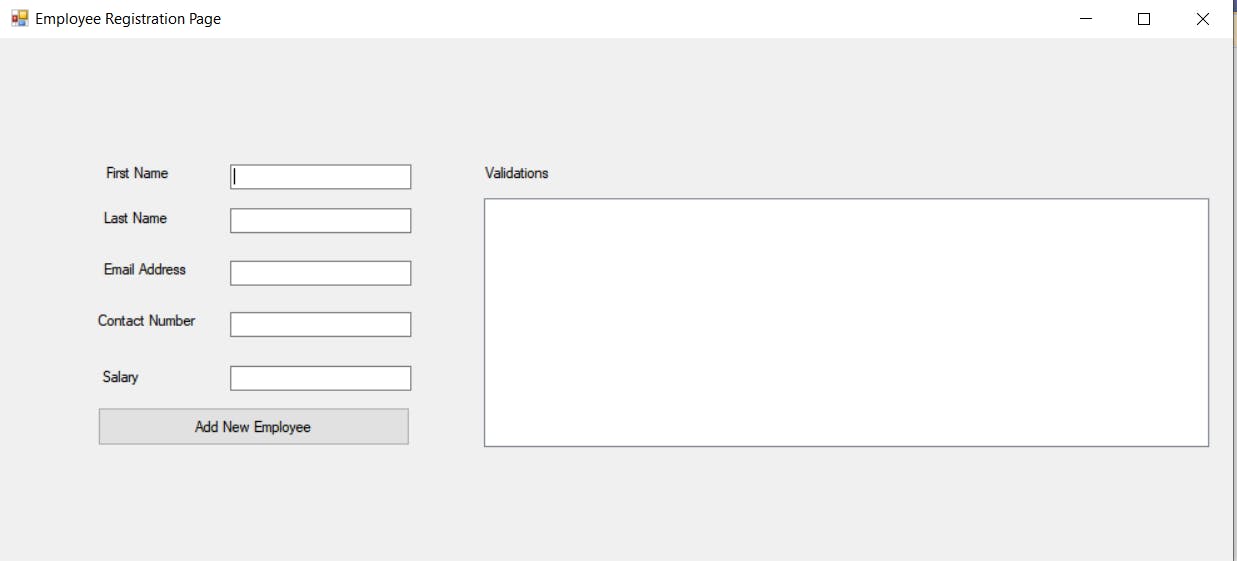
Let us make an application that is used to add employees to the database and just before adding the details to the database, we make the validation using FluentValidation. Let's keep the UI as given below where we have text fields to add the data and a list box to show all the validation messages as shown below in the list box (A big textbox!!)

To apply validation on the Employee class you create an EmployeeValidator class as given below.
using FluentValidation;
using FluentValidation.Results;
using FluentValidation.Validators;
using System;
using System.Collections.Generic;
using System.Linq;
using System.Text;
using System.Threading.Tasks;

namespace FluentValidationDemo.Validators
{
    public class EmployeeValidator : AbstractValidator<Employee>
    {
        public EmployeeValidator() {

            //Ruleset for collectively checking the FirstName and LastName properties
            RuleSet("CheckName", () =>
            {
                //Rules for first Name
                RuleFor(e => e.FirstName)
                .Cascade(CascadeMode.Continue)
                .NotEmpty().WithMessage("The FirstName cannot be empty")
                .MinimumLength(4).WithMessage("Make sure the length of the first Name should be atleast 4 characters")
                .MaximumLength(50).WithMessage("Make sure the length of the first Name should not exceed 50 characters")
                .Must(isValidName).WithMessage("{PropertyName} contains some invalid characters");

                //Rules for Last Name
                RuleFor(e => e.LastName)
                    .Cascade(CascadeMode.Continue)
                    .NotEmpty().WithMessage("The Last Name cannot be empty")
                    .Length(2, 50).WithMessage("The {TotalLength} of the {PropertyName} cannot exceed 50 characters")
                    .Must(isValidName).WithMessage("{PropertyName} contains some invalid characters");
            });


            //Rules for Phone Number
            RuleFor(e => e.PhoneNumber)
                .Cascade(CascadeMode.Continue)
                .Matches("^(\\+\\d{1,2}\\s?)?1?\\-?\\.?\\s?\\(?\\d{3}\\)?[\\s.-]?\\d{3}[\\s.-]?\\d{4}$").WithMessage("The phone number entered is not valid");

            //Rules for Email Address
            RuleFor(e => e.EmailAddress)
                .Cascade(CascadeMode.Continue)
                .EmailAddress(EmailValidationMode.AspNetCoreCompatible).WithMessage("The Email Address is invalid");

            //Rules for Salary
            RuleFor(e => e.Salary)
                .Cascade(CascadeMode.Continue)
                .NotEmpty().WithMessage("The Salary cannot be null")
                .GreaterThanOrEqualTo(1000).WithMessage("The Least {PropertyName} of Employee needs to be 1000")
                .LessThanOrEqualTo(100000).WithMessage("The max {PropertyName} of Employee cannot exceed 100000")
                .ExclusiveBetween(1000, 100000).WithMessage("The range of salary that can be allowed is 1000 to 100000")
                .PrecisionScale(4, 4, false);
        }

        protected bool isValidName(string name) {

            name = name.Replace(" ", "");
            name = name.Replace("-", "");

            return name.All(Char.IsLetter);
        }


    }

}
Advantages of using Fluent Validation
Speed of development- It is easy to work with.
Decoupling validation rules and models- Fluent Validation allows you to separate validation rules from your model and helps you structure the rules so that they are nice and readable.
Speed of execution- The rules are immutable objects meaning you can create them once and cache them. When the rules are part of the model, you’re needlessly setting them up every time. This is not a problem when working with one simple entity, but quickly becomes a performance problem when you’re working with multiple complex validators over thousands of rows. Benchmarking showed that we saved considerable time doing this – one import went from a huge amount of time to comparatively very less when we started caching validators.
Ability to work with odd relationships and dependent entities. Many of the entities we work with have dependencies on other things in the system, even though they’re not ‘formally’ related. With fluent validation, we could write validators that handle this easily.
Efficient unit testing- Validation rules are super easy to test.
Conclusion
FluentValidation provides a great alternative to Data Annotations in order to validate models. It gives better control of validation rules and makes validation rules easy to read, easy to test, and enables great separation of concerns. If it is a small system it's recommended to use Data Annotations as they are very easy to set up. But if you are working on larger, more complex systems, it's recommended to separate the validation concern using validator objects with Fluent Validation.
